|
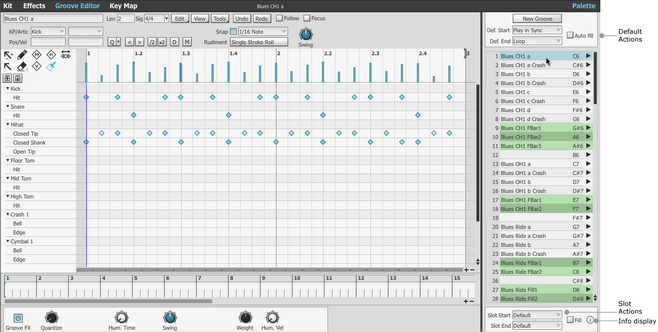
The Palette is central to the Groove engine in BFD3. It represents a 'pool' of the Grooves stored in memory and is composed of 128 individual slots. To show the Palette, the Groove Editor must be visible - click the Groove Editor button in BFD3's navigation bar.
To show the Palette if it is currently hidden, click the Palette button near the upper-right corner of the BFD3 interface. Click the Palette button again to hide the Palette when required.
|
Any Groove used in BFD3 must be assigned to a slot in the Palette, regardless of which of the various playback methods are to be used.
Use the scrollbar or mousewheel to access the full range of the 128 slots in the Palette.
Selecting slots
Click a Groove slot to select it. If the slot contains a Groove, it is now shown in the Groove Editor (if visible) and its Slot Actions settings are shown below the Palette.
Actions and Fills
|
Actions The Palette area contains 2 sets of controls above and below the list of slots, which let you define Actions, or playback characteristics. The section above the Groove slots forms the Default Action controls while the section below shows the Slot Actions for the currently selected slot. Unless Slot Actions are specified for individual slots, the behaviour of the Grooves in each slot follows the Default Action settings. Note that Actions do not apply to Grooves on the Drum Track. Any structuring of Groove playback over time in the Drum Track must be created in the Drum Track itself by arranging Parts within it using drag and drop.
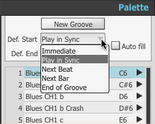
Start Actions The Start Action defines how a Groove should start playing when triggered. •Next Beat: the new Groove starts on the next beat. •Next Bar: the new Groove starts at the beginning of the next bar. |
•End of Groove: the new Groove starts at the end of the current Groove.
•Play in Sync: the new Groove starts immediately from the position within it that corresponds to the current play position.
•Immediate: the new Groove starts immediately from its beginning regardless of the current play position.
•Default: this is available for the Slot Start Action only and specifies that the slot follows the Default Start Action.
End Actions
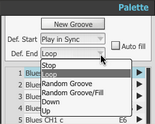
The End Action specifies what happens after a Groove completes playback.
•Stop: the Groove stops (in effect, stopping Groove playback entirely).
•Loop: the Groove repeats.
•Random Groove: a random Groove in the Palette is played.
•Random Groove/Fill: a random Groove or Fill in the Palette is played.
•Down: the Groove in the next slot in the Palette is played.
•Up: the Groove in the previous slot in the Palette is played.
•Default: this is available for the Slot End Action only and specifies that the slot follows the Default End Action.
|
Fill slots and Actions The Slot Actions section contains the Fill setting. If this button is activated, the current Groove slot is designated as a Fill slot and highlighted in green. Designating a slot as a Fill means that it can be triggered if the Random Groove/Fill End Action is specified on another slot (the Slot End Action of the Fill slot should typically be set to Random Groove), or by the Auto-Fill button located in the Default Actions section. |
When activated, the Auto-Fill function plays a Fill slot at random at a definable period (a number of bars defined in the Preferences) during Groove playback.
|
Fill Slot End Actions Fill slots feature the following Slot End Actions: •Stop: Groove playback is stopped. •Fill (Prev Groove): the Groove that was previously playing before the Fill is played again. •Random Groove: a random Groove in the Palette is played. |
Previewing Grooves
|
The playback indicators on the right of each slot in the Palette double as Preview buttons. Click the button to play the Groove contained within the slot. Once playback of a Groove has been started, it then follows the behaviour defined by its Slot Actions settings. Click another slot's Preview button in order to start playing the Groove within it instead. The method of transition is dictated by the Slot Start Action setting. Stopping previews Each Groove can be stopped by clicking its respective Preview button again. You can also use the Stop or Panic buttons in the Transport to stop playback of all currently playing Grooves. |
Preview mouse behaviour
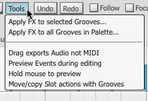
Activating the Hold mouse button to preview setting in the Editor Tools menu results in previews being active only while the mouse button is held down on a Preview button. When the mouse button is released, playback stops.
Playing Grooves
Playing Grooves using Auto-play modes
The Auto-play mode function is crucial in determining how the Groove engine is used. It has 3 modes:
|
1. Palette By default, BFD3 is in the Palette Auto-play mode. In this mode, BFD3 plays back Grooves in the Palette when the transport is started. |
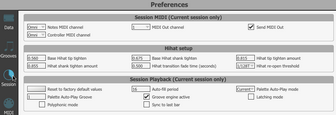
3 sub-modes exist for this mode, configurable in the Session Preferences with the Palette Auto-Play Mode setting:
|
Current When playback is started the currently selected Groove in the Palette is played according to the behaviour defined by Slot Actions. This is the default sub-mode for the Palette Auto-Play mode. Since the currently selected Groove is also shown in the Groove Editor, this mode is very useful when editing a Groove. Set the Groove's Slot End Action to Loop so that it keeps looping while you edit. Clicking on another Palette slot that contains a Groove causes it to start playing and stops the original Groove. |
Groove
In this sub-mode, you can specify a specific Groove to play when the transport is started. The desired Groove slot is specified via the Palette Auto-Play Groove setting in the Session Preferences.
Random
In this sub-mode, a random Groove from the Palette is played when the transport is started.
|
2. Grv. Off When the Auto-Play mode is set to Grv. Off, Grooves are only heard when they are played via MIDI notes, or when the Preview buttons are used to start playback. |
3. Track
Choosing the Track Auto-Play mode allows you to arrange a sequence of Grooves from the Palette within BFD3's Drum Track.
Playing Grooves via MIDI
BFD3's Groove slots can also be mapped to MIDI notes so that they can be played with a keyboard or other controller that sends MIDI notes. Groove slots must be assigned to MIDI keys in BFD3's Key Map panel. The default BFD3 Key Map features MIDI assignments for the first 41 Groove slots.
Latching mode
By default, Grooves play while the MIDI note is held down. If the Latching mode setting is enabled in the Grooves Preferences, playback of a Groove is toggled on and off when its MIDI note is played. In other words, play a Groove's MIDI note once to start playback - playback then continues as normal according to End Actions. Play the same note to stop playback, or use the Stop or Panic buttons in the Transport.
Whichever mode is used, the behaviour when the Groove starts depends on its Start Action. In most circumstances you would typically set this to Play in Sync, Next Bar or End of Groove.
Managing Grooves in the Palette
Moving and copying Grooves
|
Grooves can be moved and copied around slots using drag and drop - hold down the ALT key while dragging in order to copy a Groove. When the destination slot which already contains a Groove, the contents of both slots are swapped. When copying, any destination content is overwritten. If the Move/copy slot actions with grooves setting is enabled in the Groove Editor Tools menu, a Groove slot's Fill status and other Slot Actions settings are transferred with its contained Groove when it is swapped with or moved/copied to another Palette slot. |
Multiple selections
The above processes can be conducted on multiple selections - hold down the CTRL or SHIFT keys when clicking to select slots to create arbitrary or contiguous selections.
When multiple Grooves are moved, they are placed on sequential Groove slots ascending from the slot on which they were dropped. If any other Grooves already exist within this sequence of slots, they are swapped into the original slot of the Groove which replaces it.
Even if an arbitrary multiple selection is moved or copied (in other words, the selected Grooves are not all in neighbouring slots to each other), the moved or copied Grooves are placed on sequential, neighbouring available slots.
|
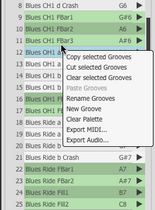
Slot context menu Right-clicking on any selected Groove slot displays the Slot context menu containing a number of further Groove-based operations. The Slot context menu features a number of functions for managing Grooves in the Palette such as the Cut, Copy, Clear, Paste and Rename functions for selected Grooves. When the Rename Grooves function is used on a multiple selection, a numerical suffix is used for the second Groove onwards. There are also functions to create a New Groove (if you want to write or record a Groove from scratch in the Editor) to clear the contents of the Palette entirely (Clear Palette) and to export selected Grooves as MIDI or audio (Export MIDI.../Export Audio...). The Cut and Copy functions can also be used to insert Grooves onto the Drum Track using the Paste functions on the Part context menu. |
Info display
|
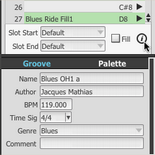
The Info display in the Palette allows you to view and edit additional information for Grooves and the entire current Palette. Palette Info display visibility Click the Info display button to reveal the display at the lower part of the Palette panel. Click the button again to hide it and devote all available space to the Palette. The border between the Info display and the rest of the Palette can be clicked and dragged up/down to adjust the visible area of each section. Info display fields Click the Groove button to show the Groove Info display, and the Palette button to show the Palette Info display. Any changes are stored with the Groove or Palette when it is next saved. If you have assembled your own set of individual Grooves in the Palette (without starting from a loaded factory Palette), the Palette Info display's fields are empty. |
Name
The name of the Groove/Palette is shown here and can be edited by clicking the field. If no name has been entered, the filename of the Groove or Palette is shown.
Author
The name of the Groove/Palette author is shown here and can be edited by clicking the field.
BPM
This shows the recommended tempo of the Groove in beats per minute (BPM), and can be edited by clicking the field.
Please note that Grooves are always played back at the current tempo, but this field shows what the author considers is the best tempo for the Groove.
|
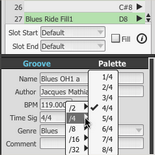
Time Sig This shows the time signature of the Groove and can be edited using the drop-down menu or by clicking and typing in the field. It is possible for the current time signature to be different to that of the individual Groove itself. If this is the case part of the Groove may be looped or truncated as necessary to fit the duration of the bar. Genre Choose the Genre of the current Groove/Palette using the drop-down menu. |
Comment
An additional text field is provided for adding your own notes to the stored information for the Groove/Palette.
