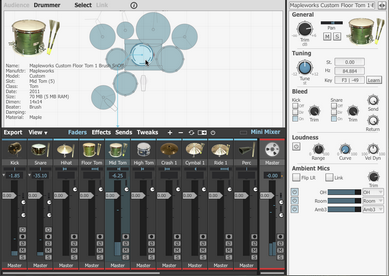
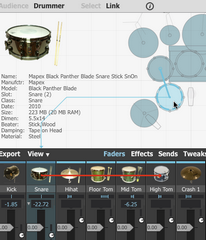
The kit display offers a top-down view of the current kit, representing its physical layout. Each part of the kit that is shown represents a Drum slot.
Selecting slots
|
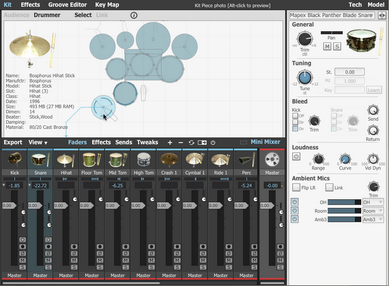
The Kit display has 2 modes - Select and Link - selectable via the corresponding buttons at the top of the panel. With the Select function active, clcik a Drum slot in the display to select it. When a slot is selected in the Kit display, it also becomes selected in the mixer, and vice versa. Its contents are also shown in the Drum Editor if it is currently visible.
When the Link function is active, slots cannot be selected. See below for details of using Link mode. |
Slot indicators
|
Moving the cursor over a Drum slot results in indicating the location of the slot in the mixer with an arrow. The same is true of the reverse - mousing over a Drum mixer channel highlights the corresponding slot in the Kit display (if it is currently displayed) using the same type of indicator arrow. In the screenshot, the Snare slot is selected - shown by the selection indicators on the Kit display and mixer - but the cursor is hovered above the Hihat slot - its mixer channel is indicated by an arrow. |
Auditioning Drums within slots
The current contents of any slot can be quickly auditioned by clicking the slot. This plays the main articulation for the Drum - closed tip for hihats or 'Hit' for other Drum types. To audition any articulations, use the Articulations section in the Drum Editor Model page.
Drum event indicators
When a Drum receives a MIDI, Groove or preview event, its surface flashes in the kit display to indicate that it has been played.
Info display
|
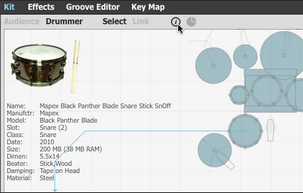
Click the Info display button to show the Kit display info. This shows information about the Drum slot under the cursor. If the cursor is moved away from any slots, information about the currently selected slot is shown. The display shows information such as the name, manufacturer, model, materials and other information about the Drum within the slot. This display also shows the Drum Slot identifier, the Class (type) of Drum currently loaded into it and its Size, in MB, both on disk and currently in RAM.
|
Audience / Drummer perspective
By default, BFD3 is set to Drummer perspective, meaning that the panning of the kit is oriented towards the drummer's perspective, as seated at the drumkit.
Switching to Audience perspective by clicking the Audience button inverts all mic channels within BFD3, meaning that the kit is heard from the other side - the audience facing the drummer at the kit. Click the Drummer button to switch back to Drummer perspective.
Link mode
|
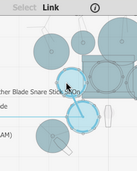
Enter Link mode by clicking the Link button at the top of the Kit display panel. When the Link function is active, it is not possible to select Drum slots in the Kit display. Instead, this mode is used for linking Drums together for layering purposes. |
|
To link two Drums while in Link mode, click and drag one of the Drums (the source) onto the other (the destination). When the source Drum is triggered, the linked destination Drum is also triggered. If it is the same Drum type, the corresponding articulation is triggered. If the destination Drum's Class differs from that of the source Drum, an attempt is made to trigger an articulation with the same name. If this does not exist, the first articulation is played ('closed tip' for hihats and 'hit' for all other Drum types). It is also possible to set up Links using the slot context menu - see below. Note that to layer specific individual articulations, it is necessary to set this up in the Key Map. |
|
After the link has been created, it is represented on the Kit display and in the mixer when the mouse cursor is moved over the source slot. Removing a link To remove a link, right-click on the source Drum slot and use the Unlink from... sub-menu on the slot context menu that appears. A list of links from the Drum are shown in the context menu that appears. Click on the link that you want to remove in order to break the link. |
Slot context menu
|
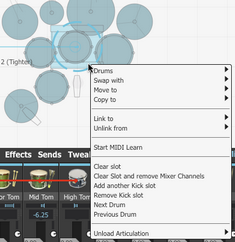
Right-click on a slot to display the slot context menu. Note that the channel context menu applies only to the slot on which it appears, regardless of whether multiple slots are currently selected. The exception is the 'Remove all unused' function, which removes all currently unused channels in the mixer. The Slot context menu is also available on the mixer channel context menu for Drum slots (within its Drum sub-menu). Drums load menu This menu item is used for loading Drums without using the Browser. The item opens a sub-menu that displays the available Drums in the database, arranged into sub-menus according to their parent library. Navigate to the required Drum in the menu and click on it to load it. |
|
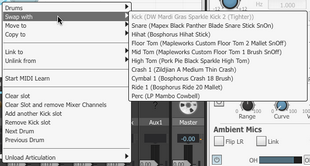
Swap with These menu items allow you to swap, move and copy Drums between slots. All slots in the current kit size are shown in a sub-menu for each function, with details of their contents if applicable. Navigate to the required slot in the list and click on it to perform the swap, move or copy operation. If a move or copy operation is attempted on an occupied slot, a warning is shown and you are prompted for confirmation in order to continue. |
Generally, during conventional kit-oriented usage, these functions should be used for rearranging kicks, toms, cymbals and percussion. It is recommended to avoid rearranging snare and hihat slots, as these slots feature more articulations than others - if a snare or hihat is moved to a slot with fewer articulation mappings, the additional articulations are inaccessible via MIDI until they are assigned to keys using the Key mapping panel. All articulations are always accessible via the Groove engine.
Link to
This context menu item performs the same function as Link mode (see above), using a list of Drum slots in a sub-menu instead of dragging one slot over another.
Unlink from
This function allows you to unlink Drum slots that have been previously linked using the Link function.
In the context menu for the source slot, any links that exist are shown as items on the Unlink from sub-menu. Click an item to remove the link.
Start MIDI Learn
This function starts the MIDI Learn wizard from the slot - see below for details of this function.
Clear slot
This function clears the slot of any kit-piece it contains.
Add another [Drum type] slot
This function adds another Drum slot of the same type to the kit. To add a channel for any type of kit-piece, use the Add Channel button in the mixer.
Note that only 1 hihat slot is available in BFD3 - it is not possible to add a second.
Remove slot
This function removes the selected Drum slot.
Next Drum
Clicking this item loads the next Drum of the same type from the available Drums in the database.
Previous Drum
Clicking this item loads the previous Drum of the same type from the available Drums in the database.
Unload Articulation
This sub-menu displays all the articulations present for the Drum in the slot - click on any articulation to unload it from the current session.
Unloading any articulation(s) that you don't need frees up RAM resources, as the associated pre-cached start portions of audio are unloaded from RAM.
Any unloaded articulations remain unavailable until another Drum is loaded into the slot.
Drum memory display
|
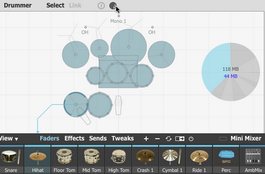
Click the Drum memory display button to show a graphic indicating the amount of RAM for the currently selected Drum. •The upper figure shows the size of the entire Drum on disk. •The lower figure shows the amount of RAM used by the cached portions of the Drum's samples. •The circular graph represents the amount of RAM used by the current Drum in relation to the rest of the Kit. |
MIDI Learn wizard
|
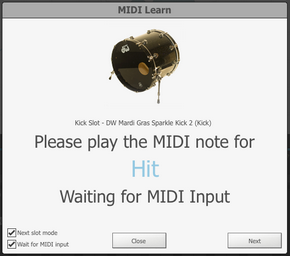
The MIDI Learn wizard is a simple tool for mapping Drum articulations to MIDI notes. It is provided as an alternative to using the Key Map panel, although for more complex mapping operations and fine-tuning existing mappings, it is necessary to use the functions in the Key Map panel. When the wizard is launched using the Start MIDI Learn button from a Drum's slot context menu (see above), the relevant Drum's first articulation is presented on-screen, along with a message indicating that BFD3 is waiting for MIDI note input - play a MIDI note to map it to the articulation. The wizard then allows an additional time period for a different MIDI note to be played (in case the original note was played in error) - this additional time period can be defined using the MIDI learn accept time setting in the Preferences. The default setting is 5 seconds. |
The wizard then moves onto the Drum's remaining articulations until they are all assigned or until the wizard is closed with the Close button.
Next slot mode
If this setting is activated, the wizard moves onto the Drum in the next slot after all the current Drum's articulations have been assigned to MIDI notes.
If Next slot mode is deactivated, the wizard is closed after all of the current Drum's articulations have been assigned.
Wait for MIDI input
When this setting is activated, the wizard waits indefinitely for a MIDI note to be played before moving onto the next articulation in the Drum.
When Wait for MIDI input is deactivated, a set time is allowed for a MIDI note to be played for each articulation (the default is 15 seconds). If no note is received within this time, no assignment is made for the articulation.
The amount of time that is allowed can be defined in the Preferences using the MIDI learn skip time setting.
