Click the Key Map button in the main BFD3 navigation bar to display the Key Map panel. This panel provides functions for mapping Drum articulations and Grooves to MIDI notes so that they can be played using MIDI note input. It is possible to modify and fine-tune existing Key Maps, add further assignments for additional Drums or create new Key Maps from scratch.
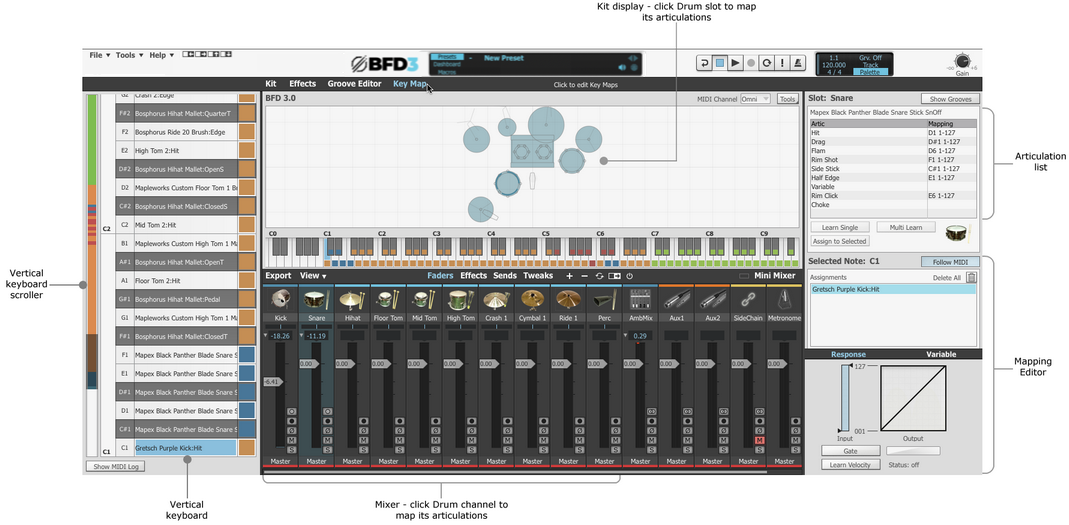
Mapping page layout and MIDI keyboard displays
|
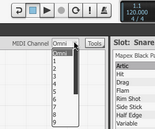
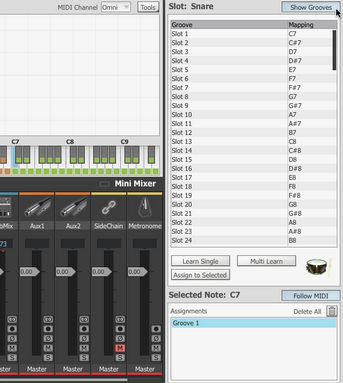
MIDI channel Key Map assignments can be created on any MIDI channel. By default, BFD3 responds in Omni mode - in other words, on any MIDI channel. This can be changed to a specific channel using the MIDI Channel drop-down menu. Alternatively, double-click the field and type a number between 0 and 16 (0 = Omni).
|
Vertical and Horizontal keyboard layouts
|
The Key Map panel features 2 representations of the MIDI keyboard range - horizontal and vertical. These essentially function identically to each other, although the horizontal keyboard lacks individual note and name labels. Click and drag the keyboard scroller to the left of the Vertical Keyboard to adjust its visible area, or use your mousewheel. Click and drag above the keys on the Horizontal Keyboard to adjust its visible area (depending on the current width of the BFD3 window, the entire keyboard may already be visible). |
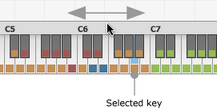
Key colouring (both keyboards)
Keys feature colour-coding to represent various states.
Orange Green Red Dark Blue
Light Blue shading Purple shading |
One or more articulation mappings exist on the key A Groove note exists on the key A slot choke note exists on the key Keys mapped to the currently selected Drum
Currently selected key Destination slot during a mapping operation |
Key labelling (vertical keyboard only)
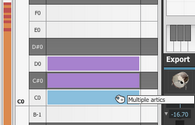
Keys with an articulation are labelled with the current Drum loaded into the relevant slot along with the articulation name. If the slot is empty, the default slot name is shown.
If multiple articulations exist on a key, multiple is shown.
Keys with Grooves always show the relevant Groove slot number.
Previews
Whenever a key on the keyboard is selected, it is previewed in the same way as it would be heard when being played via MIDI. Previews are velocity sensitive depending on the click position on the key:
•On the horizontal keyboard, the loudest velocity is heard towards the lower part of the keys.
•On the vertical keyboard, the loudest velocity is heard towards the right of the keys.
To select a key without hearing a preview, click it while holding down the ALT key.
Follow MIDI
Activating the Follow MIDI button results in an incoming note selecting the relevant key in the keyboard layout.
The last state of this button is used when launching a new instance of BFD3.
Articulations list
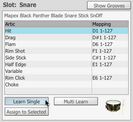
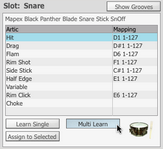
The Articulations list shows the available articulations for the currently selected Drum slot.
This list is only visible if the Show Grooves button is deactivated.
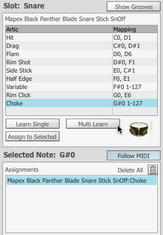
After one or more mappings have been created, the mapped MIDI note is shown under the Mapping column for each Artic (Articulation) in the Articulations list.
The numbers shown after the MIDI note represent the velocity Input Range for the assignment. When multiple articulations are mapped to a key, velocity split ranges can be set up using the Input Range control in the Mapping Response panel - see below. This velocity readout is not available if the articulation has been mapped to more than 1 key.
Mapping Editor
The Mapping Editor provides a number of functions for the articulations on the currently selected Key. It features an Assignments list displaying the current assignments on the key, as well as the Mapping Response panel which provides advanced fine-tuning functions for mappings.
Show Grooves
Activating the Show Grooves button displays a list of the Groove Palette's 128 Groove slots in place of the Articulation list. This mode is used in order to assign Grooves to MIDI keys.
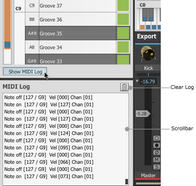
Show MIDI Log
Activating this button displays the MIDI Log at the lower-left part of the interface. The MIDI Log provides an overview of incoming MIDI messages, useful for troubleshooting mapping operations. Click the Show MIDI Log button again to hide the panel.
Mapping Drum articulations to keys
Note that it is not necessary to load a Drum into a slot in order to map the slot's articulations: the default choices of articulations for the slot's intended purpose are assignable. However, it is highly recommended to do so in order to be able to test and hear the results of assignments.
Using the Assign to Selected button
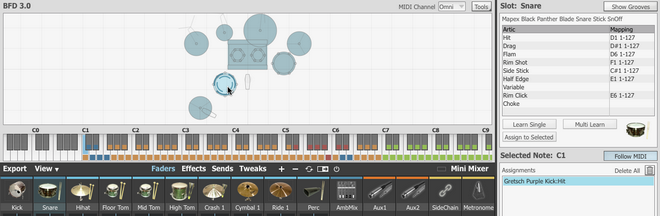
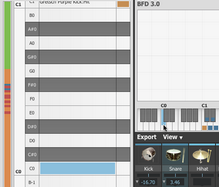
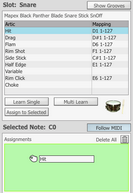
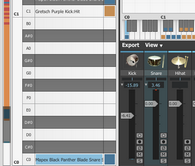
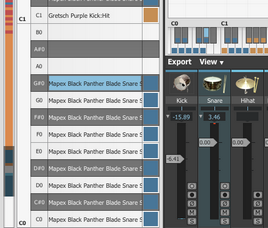
1. Select a Drum such as the Snare in this example, either in the Kit Display or in the Mixer. The Drum's articulations are shown in the Articulations list.
Note that the selected key in this example is still a key assigned to the Kick.
|
|
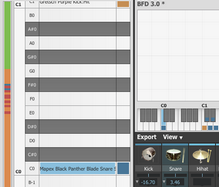
2. Select the key to which you wish to assign a Snare articulation. |
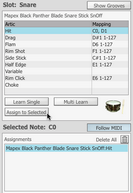
3. Select an Articulation - the Hit articulation in this example, and then click the Assign to Selected button to make the assignment. The selected key, showing the mapping that has just been created, is shown in the Mapping Editor below the Articulation list for the selected slot. |
|
|
The mapping is also represented on both keyboards. |
Select multiple articulations using SHIFT and CMD/CTRL before clicking the Assign to Selected button to stack them all on the key. |
Drag and drop to the Mapping Editor for the selected key
|
|
|
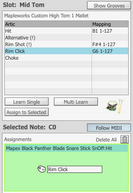
With a key selected, drag and drop the desired articulation to the Mapping Editor Assignments list. Any previous assignments on the key are replaced. |
To stack another articulation to the key, drag and drop an articulation (select a different Drum slot first if required) onto the list while holding down the ALT key. |
Multiple articulations from the same Drum can be dragged simultaneously to the same key's Assignments list to stack them. |
Drag and drop directly to any key(s)
Articulations can also be dragged to keys in the horizontal or vertical keyboards. If the key already contains any assignments, they are replaced.
|
|
Hold down ALT to stack another articulation onto a key with existing assignment(s). |
Drag multiple assignments to either keyboard to assign them to sequential keys ascending from the destination key. |
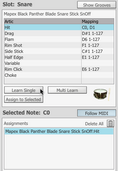
Use the Learn Single function
|
The Learn Single function is designed to allow you play a MIDI key to which to assign the currently selected articulation.
To map an articulation to a key, first select the desired Drum and articulation within it. Then, click the Learn Single button. |
|
|
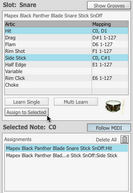
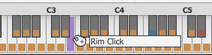
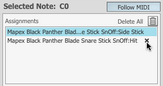
Now play a note - in the above example, C0 has been played (and selected as the Follow MIDI button is activated). The new mapping is shown in the Assignments list. |
The mapping is also represented on both keyboards. |
Use the Multi Learn function
|
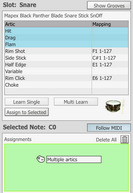
The Multi Learn function lets you play multiple MIDI keys to map multiple articulations from the currently selected Drum. Select an articulation and then click the Multi Learn button - this function waits for multiple MIDI notes, assigning them to each of the subsequent articulations in the Drum. The process ends after the last articulation in the list, or when the Multi Learn button is clicked again. |
|
|
The additional MIDI note that has just been mapped to each articulation is shown in the Articulations list along with the original mappings. Due to limited space, the active velocity range cannot be shown if an articulation has been mapped to multiple keys. The mappings are also represented on both keyboard displays. |
|
Stacking multiple articulations on a single key
As described above, articulations can be stacked, or layered, onto a single key. This offers more advanced Drum layering than the simple Drum Link function in the Kit display but is intended only for using MIDI notes rather than the Groove engine to play BFD3's sounds.
When articulations are stacked on a key, they simply play at the same time at the relevant velocity whenever the key is played.
It is also possible to create 'velocity splits' with layered articulations using the Mapping Response panel - see below.
Please note that Choke articulations cannot be stacked with other articulations. Attempting to assign a Choke articulation results in it overwriting any previous contents on the key. Likewise, attempting to stack any articulation onto a key already containing a Choke, the existing Choke is overwritten.
Special articulations
Choke
Any playing articulation for a Drum can be choked by playing the slot's Choke articulation. This stops the decay of any Drum articulation according to its Choke Response settings (default settings exist in the BFD3 Preferences, while settings for loaded Drums exist in the Drum Editor
Chokes can be stacked on the same key with other articulations - when triggering an articulation, it may be useful to choke 1 or more other Drums which may be playing.
BFD3 can also choke cymbal slots with polyphonic aftertouch signals from electronic drumkits - see the next section.
Variable tip (hihat slot only)
Variable shank (hihat slot only)
These articulations appear for the Hihat slot only and are intended for use with electronic drumkits - see the next section.
Variable snare (snares only)
This articulation appears for Snare slots only and is intended for use with electronic drumkits - see the next section.
Mapping Grooves
|
Click the Show Grooves button in order to map Groove slots in the Palette to MIDI keys. The view on the right side of the Key Map panel changes to show a list of all 128 Groove slots. Groove listing Under the Groove column, The list of Groove slots shows the name of the Groove currently in each slot if it exists alongside the slot number. The Mapping column displays the current MIDI note mapping for the Groove if it exists. Creating mappings Grooves are mapped to keys in exactly the same ways as Drum articulations: •Drag and drop from the list of slots to a key or to the Mapping Editor list for the currently selected key •Select a key, select a Groove slot and then click the Assign to Selected button •Use the Learn Single or Learn Multi functions |
Mapping Editor
The Mapping Editor panel displays information and additional parameters for the mappings that exist on the currently selected key.
Assignments list
|
Each articulation that has been mapped to the key is shown in the articulation list. Click any articulation to select it and edit its parameters. Delete mapping When the cursor is hovered above a mapping in the list whether it is a Groove or Drum articulation, a Delete mapping button ('X') is shown at the right. Click the button to delete the mapping. |
Delete All
Click this button to delete all mappings on the currently selected key.
Mapping Response panel
The Mapping Response panel cannot be visible at the same time as the Hihat or Snare Response panels - click the Response button to display the Mapping Response panel if it is not already visible.
Note that the Snare panel is only visible if a Variable Snare articulation exists on the currently selected key. The Hihat and Snare Response panels are described in the next section.
The Mapping Response panel features a number of functions for adjusting the way that incoming MIDI note velocity is mapped to articulations.
This panel is only concerned with articulation mappings - its controls are not available if a Groove key is currently selected.
Input (Input Range)
This control defines the MIDI note velocity range to which the selected articulation responds. The primary use for this control is for creating velocity-based splits for keys with multiple articulations, so that different velocity ranges can trigger different articulations.
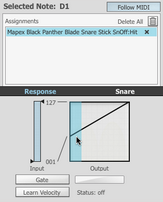
Output (Output Curve)
This control adjusts how input velocities are translated to the range of the articulation's velocity layer samples.
By default, a linear 1:1 mapping is used - the active range of MIDI input velocity (defined by the Input control) is distributed proportionally across all available velocity layers for the articulation.
The graph allows you to change the lowest and highest velocity layer that is accessed by the velocity range of the input range, as well as vary the curve response from linear to exponential (drag down) or inverse-exponential (drag up).
|
|
|
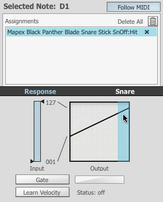
Click and drag up/down at the left side of the graph to set the lowest velocity layer for the mapping. |
Click and drag up/down at the right side of the graph to set the highest velocity layer for the mapping. |
Click and drag up/down in the centre of the graph to set the response curve of the range. |
Gate
With the Gate setting activated, any incoming MIDI notes with velocities outside the input range are ignored for the articulation mapping. This behaviour can be very useful when creating velocity splits or for eliminating crosstalk-related issues when playing BFD3 from an electronic drumkit.
With the Gate button deactivated, such notes trigger the articulation, with velocity values that are forced to the Input Range boundaries. For example, if the Input Range is set from 25 to 90 and an incoming note's velocity is 10, it is treated as a velocity of 25. If an incoming note's velocity is 100, it is treated as a velocity of 90.
|
Learn Velocity This function is designed to analyze incoming MIDI note input and set the Input Range accordingly. Activate the button and play a series of low-velocity and high-velocity notes within the velocity range you intend to use with the articulation mapping. The detected notes are analysed and the Input Range is set. |
Setting up velocity splits
The Mapping Response panel functions can be used for setting up velocity splits for keys containing stacked articulations.
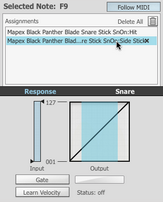
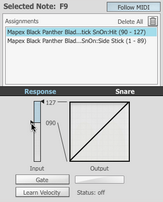
The following examples demonstrates how to create a velocity split setup for a key mapped to Snare Hit and SideStick articulations.
|
|
|
1. Select the SideStick articulation in the Assignments list.. |
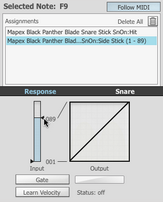
2. Set the upper limit for the Input Range control - this will be the highest velocity that triggers the SideStick. |
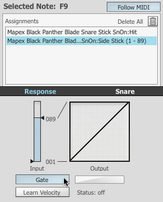
3. Activate the Gate button to ignore velocities above the upper limit. |
|
|
|
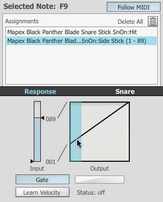
4. Optionally, fine-tune the velocity layer graph to set the lowest and highest velocity layers that will be triggered. |
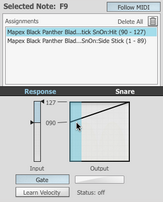
5. Select the Hit articulation in the Assignments list. |
6. Set the lower limit for the Input Range control to a value 1 higher than the upper limit for the SideStick. |

|
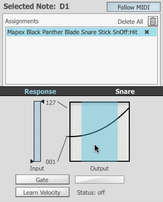
7. Optionally, fine-tune the velocity layer graph to set the lowest velocity layer that will be triggered. In this example, the snare sound triggered by MIDI notes with velocities of or above 90 is from the upper part of the velocity layer range, meaning that it is struck with high intensity.
Velocity splits can overlap each other if the Input Ranges are set up to do so, with both articulations being heard within the overlap areas. |
Additional controls
Tools menu
|
Clear all keys This function clears all current key mappings, allowing you to build a Key Map entirely from scratch. Allow multiple keys for an Articulation/Groove With this setting deactivated, any articulation or Groove can be mapped only to a single key. If an articulation or Groove is mapped again, the old assignment is lost. |
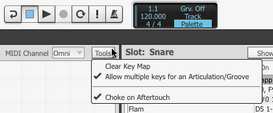
Choke on Aftertouch
This function is intended to be used with electronic drumkits - see the next section.
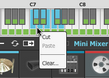
Key context menu
|
Right-click on the horizontal or vertical keyboards to display the key context menu. The menu allows you to Cut and Paste mappings between keys - use the SHIFT key to select multiple sequential keys. Any assignments that already exist on keys affected by a Paste operation are lost. The Clear... function removes the mappings on the selected keys. You are prompted for confirmation before proceeding. |
MIDI event log
Click the Show MIDI Log button to display the MIDI Event Log panel. This panel displays a list of all MIDI events received by BFD3's MIDI input and can be very useful for troubleshooting during mapping tasks.
Click the Show MIDI Log button again to hide the panel.
Note that this log is also provided as an auxiliary window: use the Show MIDI Log function in BFD3's Tools menu to open the external window.
|
The log displays incoming MIDI data in the following format: MIDI Notes Channel [1-16] Note On [C0 - G10] Velocity [1-127] MIDI Continuous Controllers (CCs) Channel [1-16] CC [0-127] Value [0-127] Other MIDI messages (e.g. Pitchbend etc.) Channel [1-16] Message [value]
Use the scrollbar to display earlier events in the log buffer and the Clear Log button to clear the buffer. |
Saving in the Key Map panel
All the following functions can be found in BFD3's File menu.
Save Key Map
This function opens a system file save dialog prompting for a location and filename to save the current Key Map.
It is recommended to save the Key Map to the default location - <user location>/Maps - so that it is accessible from the Load Key Map panel without further adding and scanning of data locations.
Save Key + Automation maps
This function saves the current Key Map and Automation Map with the same name (although the two resulting map files have different file extensions – .bfd3map and .bfd3auto).
Save MIDI Event Log
This function saves the contents of the MIDI Log for diagnostic and troubleshooting reasons. Logs are saved with the .log file extension.